


I actually got this ESP32 a few years ago — back when 5G wasn't even a thing here in India and most people were still flexing their "fast" fiber routers.
I remember one day, I was chilling at Domino's , bored as hell, so I pulled out my ESP32 and ran a simple Wi-Fi deauth script. Within seconds, every device in the nearby electronic store (not naming it, lol) got kicked off their Wi-Fi. Watching the staff panic while I sat with my pizza gave me actual chills . That was the moment I realized how powerful even a tiny $5 board could be.
while cleaning my room recently, I found this little guy again, covered in dust. And I thought, why not test it again in 2025 and share my honest views? Spoiler: it still slaps.
Required Files and Tools
Grab the basics:
- ESP32 board
- A real USB data cable (⚠ Note: those ₹50 charging-only cables will ruin your day)
- Arduino IDE (classic) or ESP-IDF if you want to look pro
- ESP32 Flash Tool: Used to write firmware to the ESP32
- Deauther BIN file: The precompiled binary firmware for the ESP32 deauther
Installation Steps-
1. Download Necessary Files
- Download the ESP32 Flash Tool from the provided link.
- Download the BIN file(s) to be flashed to the ESP32. or this link
2. Connect ESP32 to PC
- Use a micro USB cable to connect the ESP32 board to a Windows PC.
- Allow the appropriate drivers to install automatically if needed.
3. Open ESP32 Flash Tool
- Launch the ESP32 Flash Tool application on your PC.
- Select the correct COM port assigned to your ESP32 device.
4. Configure the Flash Tool
- Load the downloaded BIN file into the Flash Tool interface.
- Set the appropriate memory offset (typically
0x0000for standard firmware flashing).
5. Flash the Firmware
- Click the "Start" or "Flash" button in the ESP32 Flash Tool.
- Wait for the tool to erase the existing firmware and write the new BIN file onto the ESP32.
- Once flashing is complete, you will see a notification in the tool interface.
6. Disconnect and Test
- Disconnect the ESP32 from your PC and reboot it.
- The ESP32 should now operate as a deauther device according to the installed firmware.
after setting up all you need to do is just power up the board using USB cable and connected to its default AP by the SSID as pwned:
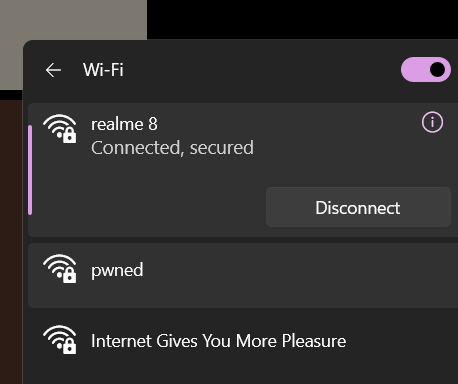
Once you connect to that access point then go to this web-sever page, 192.168.4.1 and boom

Use this project only for educational and testing purposes on your own devices and networks to comply with legal regulations else
Let's Have A Cup Of Coffee
If you enjoyed this throwback review and want me to test more hacker toys, you can support me here: Buy Me a Coffee.
NOTE- i am looking for other stuff related to cybersec to make content around it , if you got some stuff or leads dm me Satyam Pathania / Linkedin
PEACEEEEEEEE
.
.
.
.
.
.
.
.
.
- #ESP32
- #Ethical Hacking
- #Cybersecurity
- #WiFi #Security
- #IoT #Security
- #Open #Source
- #Hardware #Hacking
- #Raspberry Pi & #ESP32
- #Hackers
- #Tech #Review