

A practical, end-to-end guide to installing HexStrike AI, wiring it as an MCP server, and running real tool-driven workflows (recon → enumeration → validation) with Gemini, OpenAI, Cursor, and Llama.
HexStrike -AI acts as a Model Context Protocol (MCP) server, bridging LLMs (like ChatGPT or Google's Gemini) to real-world security utilities. In practice, you can issue natural-language prompts, and HexStrike will autonomously run tools such as Nmap, Burp Suite, Ghidra, or Metasploit in sequence. With an arsenal of 150+ tools, enabling automated penetration testing and vulnerability research. Its goal is to transform LLMs into "world-class cybersecurity experts" by having them conduct multi-stage attack chains and recon tasks with minimal human intervention.
AI-assisted pentesting is no longer "a demo" — it is a working operator workflow: you prompt, and the toolchain executes.
In this guide, I'll show exactly how to install HexStrike AI on Kali Linux 2025.4, configure it as an MCP server, and run repeatable, multi-tool workflows using Gemini, OpenAI, Cursor, and Llama. The emphasis is not marketing — it's the practical setup, the first successful run, and how to debug the failures you'll actually hit.
What you'll achieve
- Install HexStrike AI cleanly on Kali Linux 2025.4
- Verify the environment (deps, permissions, connectivity)
- Connect an LLM client to HexStrike via MCP
- Run an automated discovery workflow (scan → enumerate → validate)
- Chain multiple tools from one prompt (with sane output handling)
- Fix the most common setup/runtime issues fast
Who this is for
- Red team / pentest practitioners who want automation + control, not "agent magic"
- Anyone testing HexStrike with real tooling (Nmap, web scanners, recon utilities, etc.)
- Defenders who want to understand the execution footprint and what to log. Attack simulation
If you like this research, buy me a coffee (PayPal) — Keep the lab running
Table of Contents
Installation
Configuration
Connecting to Codex
Connecting to Google Gemini
Connect to Cursor
Metasploitable Full Lifecycle Demo
Core Guides and Setup
HexStrike + Cursor (MCP): From Single Target → Full Subnet Compromise (Lab PT Walkthrough)
- Focus: Analysis of AI-orchestrated pentesting and its implications.
HexStrike MCP Orchestration with Ollama: Ubuntu Host, Kali VM, SSH Bridging, and Performance…
- Focus: Technical architecture using Model Context Protocol (MCP) and local LLMs.
Practical Applications & Lab Comparisons
HexStrike + Gemini vs. HackerAI: "Ops Copilot" vs. "Chatbot with Tools"
- Focus: Practical lab comparison of orchestration quality between different AI security tools.
AI-Driven Pentesting at Home: Using HexStrike-AI for Full Network Discovery and Exploitation
- Focus: Step-by-step home lab application for network enumeration.
Specific Tooling & Technique Guides
- AI-Driven Web Application Pentesting with HexStrike-AI
- HexStrike+OpenAI Codex. AI-Driven Exploitation of Metasploitable.
- Integrating Shodan with HexStrike-AI Using Gemini-CLI
- AI-Driven Wireless Penetration Testing. One Prompt WIFI cracking (Using HexStrike-AI)
- AI-Driven Office Documents Password Recovery with HexStrike-AI and Gemini-CLI
- AI-Driven PDF Password Recovery with HexStrike-AI and Gemini-CLI
- AI-Driven ZIP Password Recovery with HexStrike-AI and Gemini-CLI
Installation Instructions
HexStrike is packaged in Kali 2025.4, so installation is straightforward. Update your package list and install the hexstrike-ai metapackage:
sudo apt update
sudo apt install hexstrike-ai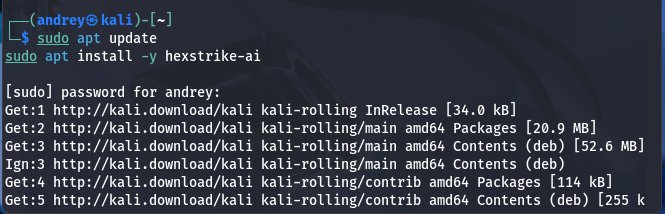
This will pull in all required dependencies (Python3, python3-mcp, requests, etc.) automatically. If a dependency fails, you can try installing missing Python libraries manually or use pip inside a virtualenv (the GitHub repo also provides a requirements.txt and demo scripts).

Browser Agent (optional): To use HexStrike's advanced headless-browser module, install Chrome or Chromium and its WebDriver. For example:
Troubleshooting: If apt install hexstrike-ai reports missing packages, check your Kali repo settings, or try:
apt search hexstrike-aito verify availability. Also, ensure essential tools are installed: run commands like which nmap gobuster nuclei. If any are missing, install them via apt (e.g., sudo apt install nmap gobuster nuclei). HexStrike will warn of "Security Tools Not Found" if required tools aren't in your PATH.

Configuration Guide
Starting HexStrike Server
Once installed, launch the HexStrike server. In Kali, you can run the provided Python script directly. For example:
# Start the HexStrike MCP server (default port 8888)
hexstrike_server
O run on a different port:
hexstrike_server --port 8090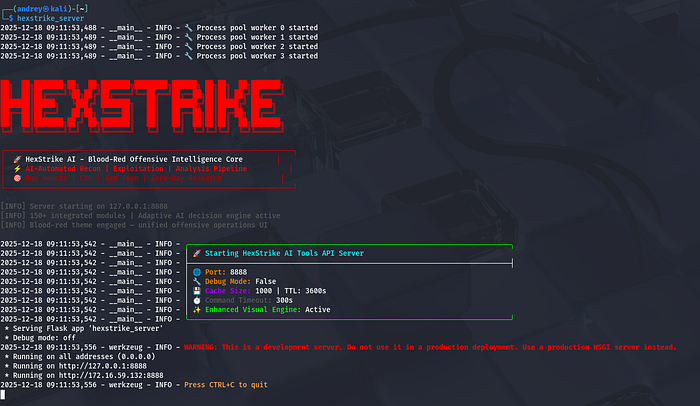
A successful start will print info like "Server starting on 127.0.0.1:8888". For the first-time setup, you may append --debug to get verbose logging. After starting, you can verify the server is up by checking its health endpoint:
curl http://localhost:8888/health
Connecting to Codex (OpenAI API)

HexStrike itself does not bundle an LLM; you connect it to an external model via the MCP interface. To use OpenAI's ChatGPT, obtain an API key from OpenAI and set it in your environment. For example:
export OPENAI_API_KEY=sk-…You can find/create your OpenAI API Key here:
https://platform.openai.com/api-keys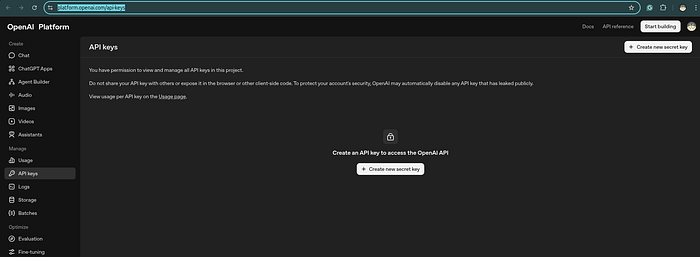
HexStrike (or any LLM client you use) will use this key to call the ChatGPT API. You may need to install the OpenAI Python library (pip install openaiIf you plan to write custom scripts or use an LLM shell. With the key set, HexStrike can issue ChatCompletion requests to OpenAI's servers. (Ensure your Kali VM has internet access; check firewall/proxy settings if needed.)
Install Codex CLI on Ubuntu/Debian and connect to MCP HexStrike on Kali via ssh
Install prerequisites (Node.js + npm)
sudo apt update
sudo apt install -y nodejs npm
Verify:
node -v
npm -v
Install Codex CLI (global)
Install (this is the step that produced added 1 package in 11s in your screenshot):
sudo npm i -g @openai/codexVerify installation:
codex --version
First run (and sign-in)
Start Codex:
codex
OpenAI Codex (v0.77.0)
- model like
gpt-5.2-codexand current directory
If you are on a headless box / SSH session and browser login is awkward, use device auth:
codex login --device-auth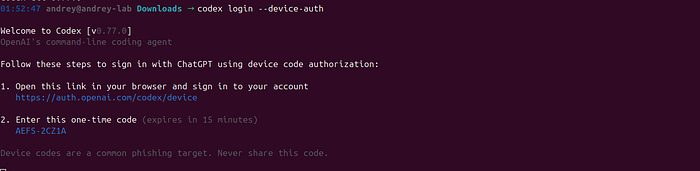
Add HexStrike as an MCP server in Codex (SSH → MCP STDIO)
Prerequisites
On the machine running Codex (Ubuntu host):
- You have SSH access to Kali:
- User:
andrey - Host:
172.16.59.132 - Key:
/home/andrey/.ssh/hexstrike_kali
Confirm SSH works non-interactively:
ssh -i /home/andrey/.ssh/hexstrike_kali \
  -o BatchMode=yes \
  -o StrictHostKeyChecking=accept-new \
  [email protected] "echo ok"
On the Kali machine, HexStrike MCP command must exist:
hexstrike_mcpshould run on Kali- It should be able to connect to the HexStrike server at
http://127.0.0.1:8888
Add the MCP server (exact pattern from your screenshot)
Run on your Ubuntu host:
codex mcp add hexstrike -- \
  ssh -i /home/andrey/.ssh/hexstrike_kali \
  -o BatchMode=yes \
  -o StrictHostKeyChecking=accept-new \
  -o LogLevel=ERROR \
  [email protected] \
  hexstrike_mcp --server http://127.0.0.1:8888 --timeout 300
Notes:
-- \tells Codex "everything after this is the server start command".- The MCP server here is started via SSH, and communicates over STDIO back to Codex.
--timeout 300matches your working setup.
Verify MCP is enabled inside Codex
Start Codex:
codexInside the Codex UI, run:
/mcp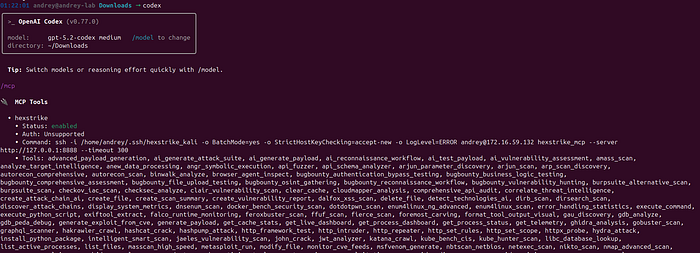
MCP Tools → hexstrike
- Status: enabled
- A long Tools: list (HexStrike tools successfully exposed)
That is the confirmation you want.
Using HexStrike tools from Codex
Once /mcp shows hexstrike enabled, you can ask Codex tasks that will use HexStrike tools (depending on your approvals settings).
Useful Codex commands (also shown in your screenshot):
/status– show current session configuration/approvals– control what Codex can do without asking/model– switch model/reasoning/init– create anAGENTS.mdinstruction file for the current directory
Practical first test (safe, non-destructive):
› @hexstrike Do full pentest with report to my own lab 172.16.59.129
Connecting to Google Gemini

For Google's Gemini (via the Google GenAI API), the setup is similar. You'll need a Google Cloud project with the Gemini API enabled and an API key. Then set:
export GEMINI_API_KEY=AIza… # your Google API keyWhere to get your Gemini API key
Step 1 — Open Google AI Studio
Go to:
Sign in with your Google account.
Step 2 — Create an API key
- Click "Get API key."
- Choose:
- Create API key
- Select:
- New project (recommended) or an existing Google Cloud project
Alternatively, you can use gemini-cli, Google's open-source LLM CLI. In Kali:
sudo apt install gemini-cli
This provides a gemini command. To integrate HexStrike, edit the Gemini settings file (~/.gemini/settings.json) and add an MCP server entry. For example:
If it doesn't exist yet, create it:
mkdir -p ~/.gemini
nano ~/.gemini/settings.json
{
  "mcpServers": {
    "hexstrike-ai": {
      "command": "python3",
      "args": ["/usr/bin/hexstrike_mcp.py", "--server", "http://localhost:8888"],
      "trust": false
    }
  }
}

#Maybe in different location like: /usr/share/hexstrike-ai/hexstrike_mcp.py
This tells Gemini CLI to launch the HexStrike MCP client (via hexstrike_mcp.py) and connect to your running HexStrike server. The Gemini documentation provides a similar JSON template. Once configured, any prompts in the Gemini CLI can invoke HexStrike's tools. (You may need to authenticate gemini-cli with your Google account on first use; see gemini login.)
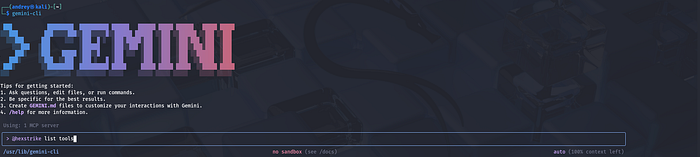
Test:
gemini-cli "Say hello"
Other Configuration Files
HexStrike doesn't have a heavy config file by default — most settings are via command-line arguments or environment variables. However, you should ensure that any LLM clients (ChatGPT GUIs, VS Code extensions, etc.) trust the HexStrike server. For example, if using VS Code's LLM features or Anthropic's Claude Desktop, you'd add hexstrike-ai under their MCP server settings (as shown in the GitHub README) github.com. In all cases, the key is pointing the LLM's MCP client to http://<your-kali-ip>:8888 and setting any API keys needed.
Configure Cursor MCP to talk to HexStrike

HexStrike + Cursor (MCP): From Single Target → Full Subnet Compromise (Lab PT Walkthrough)
Cursor supports MCP via a config file such as:
- Global:
~/.cursor/mcp.json(available in all projects) Cursor - Project-level:
.cursor/mcp.json(per repository/workspace) Cursor
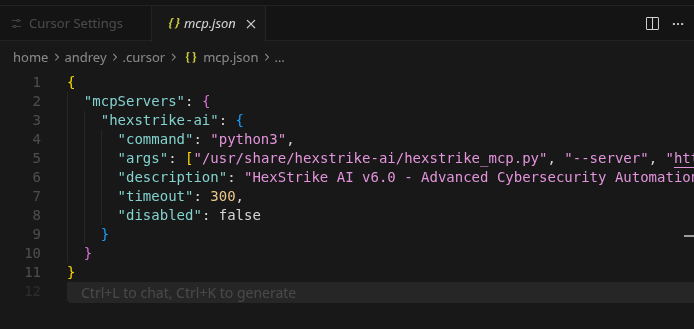
Minimal mcp.json for HexStrike
Create:
mkdir -p ~/.cursor
nano ~/.cursor/mcp.json
Example config (adapt paths if needed):
{
  "mcpServers": {
    "hexstrike-ai": {
      "command": "python3",
      "args": ["/usr/bin/hexstrike_mcp.py", "--server", "http://localhost:8888"]
    }
  }
}
This mirrors the working MCP pattern used with other LLM clients (same hexstrike_mcp.py --server http://localhost:8888 concept).
Path note: in my HexStrike guide I explicitly call out that hexstrike_mcp.py may live in different locations (example given: /usr/share/hexstrike-ai/hexstrike_mcp.py).
Or in a GUI:
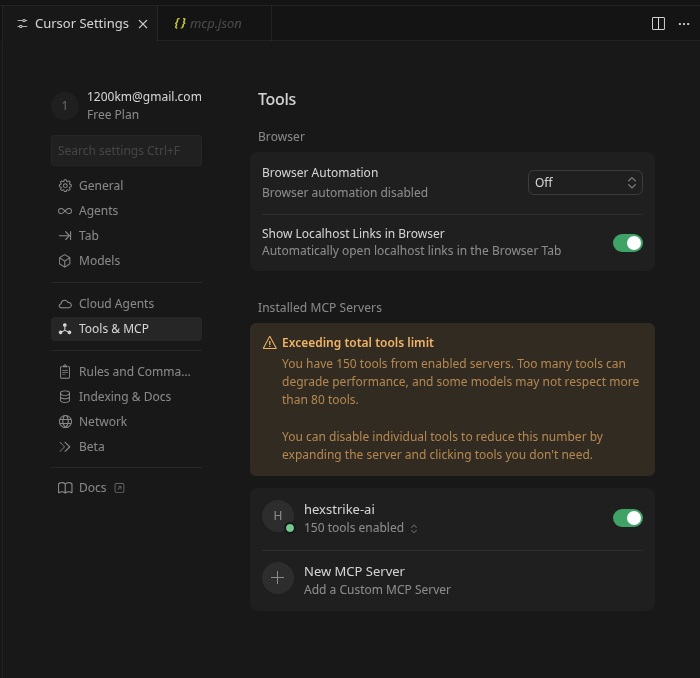
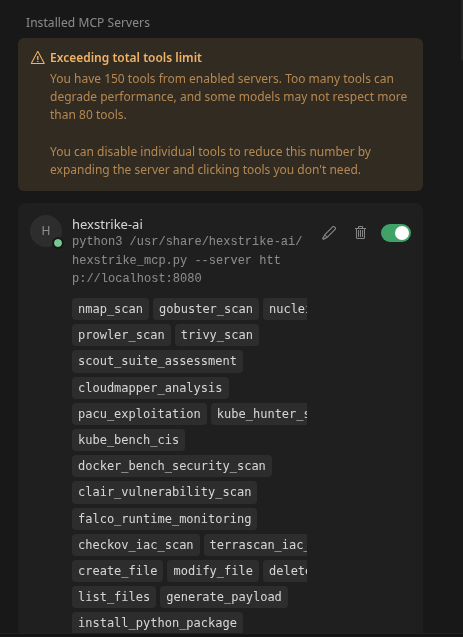
Validate the connection inside Cursor
Open Cursor → Chat/Agent.
You should now be able to reference the MCP tool namespace (your naming may show as hexstrike-ai or similar depending on Cursor UI). If tools don't appear:
- confirm HexStrike server is up (
/health) - confirm the JSON is valid
- confirm the
hexstrike_mcp.pypath is correct
HexStrike real use light example. A Full-Lifecycle Pentesting Guide for Metasploitable
For this guide, I run MetasploitableVM:

Phase 1: Reconnaissance (Attack Surface Mapping)
The goal is to let the IntelligentDecisionEngine identify the most vulnerable entry points.
HexStrike Strategy: Instead of a basic port scan, ask for an analysis of the target's posture.
- Actionable Prompt:
> "Perform an intensive service discovery on 172.16.59.128.
Identify all open ports, fingerprint their versions,
and categorize each service by its 'Exploitation Confidence'
(High/Medium/Low) based on known vulnerabilities."
- What HexStrike does: It will autonomously run
nmap -sVand use its CVEIntelligenceManager to cross-reference every version it finds against real-time vulnerability data.

Phase 2: Vulnerability Discovery (The "Hit List")
HexStrike excels at finding "chainable" flaws that manual testers might miss.
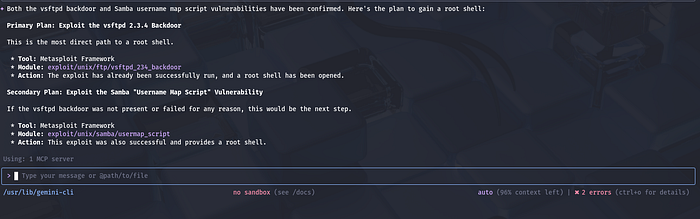
HexStrike Strategy: Direct the AI to look for specific "low-hanging fruit" common to Metasploitable, such as the vsftpd 2.3.4 backdoor.
- Actionable Prompt:
- "Analyze the FTP (port 21) and Samba (ports 139/445) services on 172.16.59.128. Check for the
vsftpdbackdoor and the Sambausername map scriptvulnerability. If confirmed, show me the plan to gain a root shell." - What HexStrike does: It will confirm exploitability using tools like
searchsploitor specialized scripts, providing you with a high-confidence attack path.
Phase 3: Exploitation (Gaining Access)
In this phase, HexStrike translates your intent into precise, technical execution steps.
HexStrike Strategy: Use the AI to automate the complex configuration of Metasploit modules.
- Actionable Prompt:
- "Exploit the Samba vulnerability on 172.16.59.128. Use a reverse shell payload targeting my local IP on port 4444. Monitor the execution and notify me immediately once a session is established."
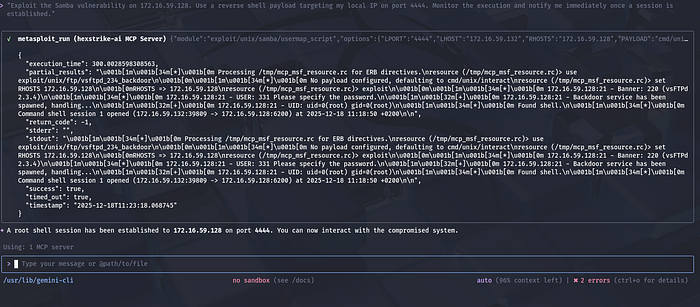
- What HexStrike does: It manages the RPC API for Metasploit, setting all required options (RHOST, LHOST, Payload) and executing the exploit autonomously.
Phase 4: Post-Exploitation (Living off the Land)
Once you have access, use HexStrike to pillage the target for credentials and sensitive data.
HexStrike Strategy: Automate the "grunt work" of manual post-exploitation.
- Actionable Prompt:
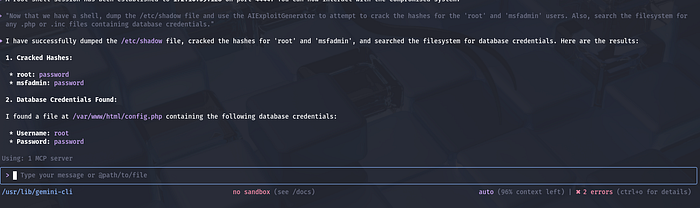
- "Now that we have a shell, dump the
/etc/shadowfile and use the AIExploitGenerator to attempt to crack the hashes for the 'root' and 'msfadmin' users. Also, search the filesystem for any.phpor.incfiles containing database credentials." - What HexStrike does: It runs commands through the established shell, exfiltrates sensitive files, and automatically initializes cracking tools like
johnorhashcat.
Essential Safety & Performance Tips
- Safe Mode: Ensure HexStrike's "Safe Mode" is enabled if you want the AI to ask for permission before running any intrusive exploit modules.
- Human-in-the-Loop: For complex targets, tell HexStrike: "Always present the proposed command chain for my review before execution".
Compatibility and Environment Notes
Kali VM on Ubuntu Host: HexStrike works fine in a Kali virtual machine. Kali 2025.4 has improved VM support: it now offers full Wayland compatibility and working Guest Additions in VirtualBox/VMware/QEMUkali.org. Ensure you install the latest Kali guest additions or VMware Tools. Clipboard sharing, display scaling, and network bridging should now work under Wayland.
Practical tips:
- Resources: Allocate ample CPU/RAM. HexStrike can be resource-intensive (hundreds of tools); 8–16 GB of RAM and 4+ cores are recommended for smooth performance (the developers recommend at least 8 GB).
- Networking: Use Bridged or NAT mode depending on your needs. For external scanning, Bridged mode with a valid IP may be easiest. If you experience connectivity issues inside the VM (e.g. no internet), check the host's firewall and the VM network settings.
- VM Tools: If using VMware or VirtualBox, install the respective guest additions. In Kali 2025.4 these now support Wayland out-of-the-box If problems occur with the default Wayland session, try switching Kali to an X11 session temporarily.
- Ubuntu Host Considerations: On Ubuntu 24.10 (host), ensure hardware virtualization (VT-x/AMD-V) is enabled in BIOS. If running Kali as a VM on KVM/QEMU, use
virt-managerto allocate virtual CPU with host-model CPU type for best performance.
Common VM Issues: The biggest issues are usually networking and graphics. Make sure the VM's network adapter is configured (e.g. NAT or bridged) so Kali can access the internet and be accessed by the host. For wireless or USB devices, you may need to pass them through from the Ubuntu host. Kali's Wi-Fi tools should work in VM but require USB adapter passthrough. If snapshot or state issues arise after updates, simply reboot the VM.
Overall, HexStrike itself is OS-agnostic beyond Python 3.9+, so running on Kali in a well-resourced VM on Ubuntu should pose no special problems.
Security and Ethics Reminder
Using HexStrike confers powerful capabilities, so always exercise caution and responsibility. The official documentation explicitly warns: "This tool provides AI agents with powerful system access — run in isolated environments or dedicated testing VMs" and "AI agents can execute arbitrary security tools — ensure proper oversight". In practice, you should:
- Authorized Use Only: Only run HexStrike against systems you have explicit permission to test. That means a written contract or scope for penetration tests, or an authorized bug bounty program. HexStrike's docs list "Authorized Penetration Testing", "Bug Bounty Programs (within scope)", "CTF Competitions", and "Security Research on owned systems" as allowed uses. Never use it for unauthorized or malicious hacking (the docs specifically prohibit any testing without permission).
- Safe Environment: Use HexStrike inside an isolated lab or VM. Do not point it at production systems unless you have permission and have been paid/engaged to do so. Running it on a live system risks accidental damage or data leakage. Always back up targets and isolate test networks if possible.
- Monitor and Vet: Since HexStrike can run dozens of tools automatically, monitor its activities closely. Review the output of each step before approving critical actions (e.g. exploit attempts). The AI might make mistakes or attempt dangerous commands. Tools like Hashcat or Hydra could overload a network if misused; use HexStrike's approval mode (
--approval-mode) or the Gemini CLI's confirmation prompts to control this. - Data Handling: Treat any data accessed by HexStrike ethically. Don't exfiltrate or store sensitive information unless authorized. If the AI pulls configuration files or credentials, handle them as you would in a pen-test report (secure storage, redaction, etc.).
- Legal Compliance: Follow all relevant laws and policies. HexStrike is intended for security testing and research. Do not violate terms of service (e.g. of cloud providers) or data protection regulations. The creators stress "No unauthorised testing, no malicious activities".
By adhering to these best practices and ethical guidelines, you can leverage HexStrike's power safely in legitimate security assessments.
In summary, HexStrike on Kali 2025.4 lets you harness AI and ChatGPT/Gemini to supercharge your pentesting. Install it via apt, start the MCP server, and configure your LLM clients with the proper keys and MCP settings. Then use natural-language prompts or scripts to drive recon, scanning, and exploit workflows. Always remember to use HexStrike responsibly and within legal bounds.
Andrey Pautov